
Beef Wellington has a reputation for being fussy, expensive, and easy to mess up. Fair enough. But once you understand what each layer is doing, it stops feeling mysterious and starts feeling doable. This version follows the Gordon Ramsay method that finally made it click for me, especially the crepe layer that keeps the pastry crisp and helps the whole thing hold together instead of collapsing into a soggy mess.
This dish is not complicated so much as unforgiving. Every layer matters.
The Dish That Humbled Me First
I had never eaten Beef Wellington before I decided to serve it at a dinner party. That is the kind of confidence that can get expensive fast.
I had watched enough Hell's Kitchen to feel like I knew what it was supposed to be. So I went to YouTube, watched Gordon Ramsay make it over and over, and figured I was ready.
I was not.
The first one was a mess. Soggy pastry. Loose layers. No structure. I made it several more times and kept getting the same result, which told me I was not dealing with bad luck. I was missing something.
Turns out, I was.
The turning point came when I noticed contestants on MasterChef adding a crepe layer before wrapping the beef. I had never seen that in the videos I studied, and I had not caught it in the older version of the recipe either. Then a few Christmases ago, I got the Gordon Ramsay Masterclass as a gift, and there it was. The missing layer. Along with a better way to handle the mushrooms.
That changed everything.
The crepe is not there for drama. It is there to absorb moisture and protect the pastry. Once I understood that, the whole method started making sense.
If you want to break the work up ahead of time, check out my Make-Ahead Beef Wellington guide. And if you already have one assembled and frozen, head straight to my Frozen Beef Wellington Cooking Instructions.
Why This Version Works
Most Beef Wellington failures come down to moisture.
The mushrooms release water. The beef gives off juices. If that moisture has nowhere to go, the pastry never has a chance.
What finally fixed it for me came down to two things:
A proper crepe layer
The crepe sits between the prosciutto and the puff pastry and acts like a moisture barrier, catching what the inner layers release so the pastry can stay crisp.
Mushrooms cooked all the way dry
The duxelles cannot be even a little wet. If the mushrooms still have moisture in them, that moisture ends up in the pastry.
Get those two things right, and the whole Wellington gets a lot more predictable.
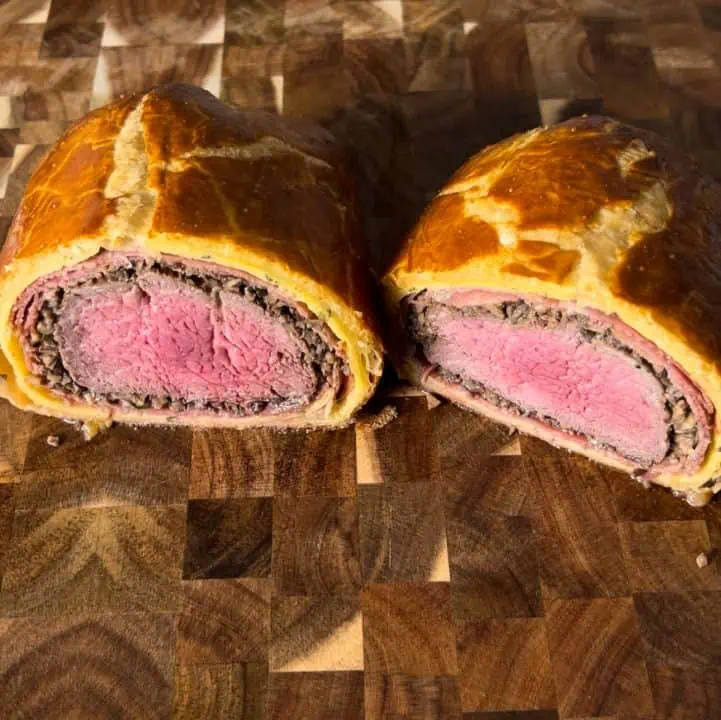
Inside-out layering order: beef, mushrooms, prosciutto, crepe, puff pastry.
How to Make the Gordon Ramsay Beef Wellington
Shape and Chill the Beef First
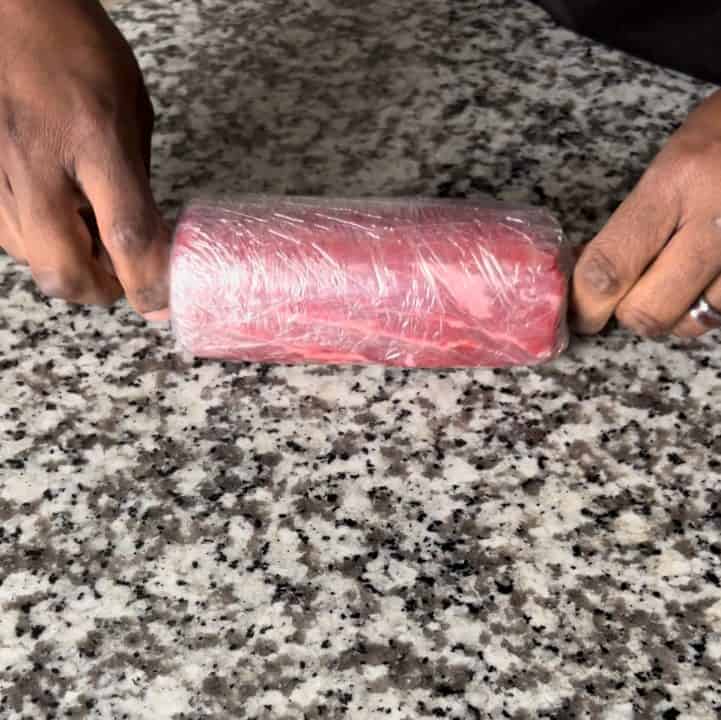
Before you do anything else, wrap the beef tightly in plastic wrap and roll it into a firm cylinder. Refrigerate it overnight if you can, or at least 30 minutes.
Do not skip this step.
The shape you create here is the shape you will carry through every other layer. A clean, even cylinder gives you better wrapping, better baking, and cleaner slices at the end. A loose tenderloin makes everything harder.
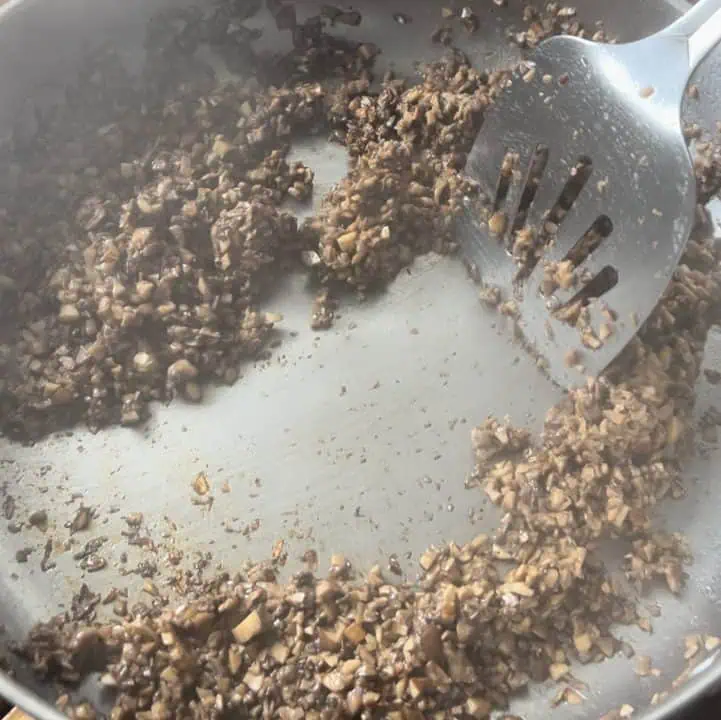
Cook the Mushroom Duxelles All the Way Down
Finely dice the baby bella mushrooms. You can use a food processor, but I prefer to dice them by hand here. The texture stays better, and it is easier not to overdo it.
Heat the olive oil in a pan over medium heat. Add the mushrooms, then season with salt, pepper, and thyme.
At first, they will look like far too much for the pan. Then they will start releasing liquid. A lot of it.
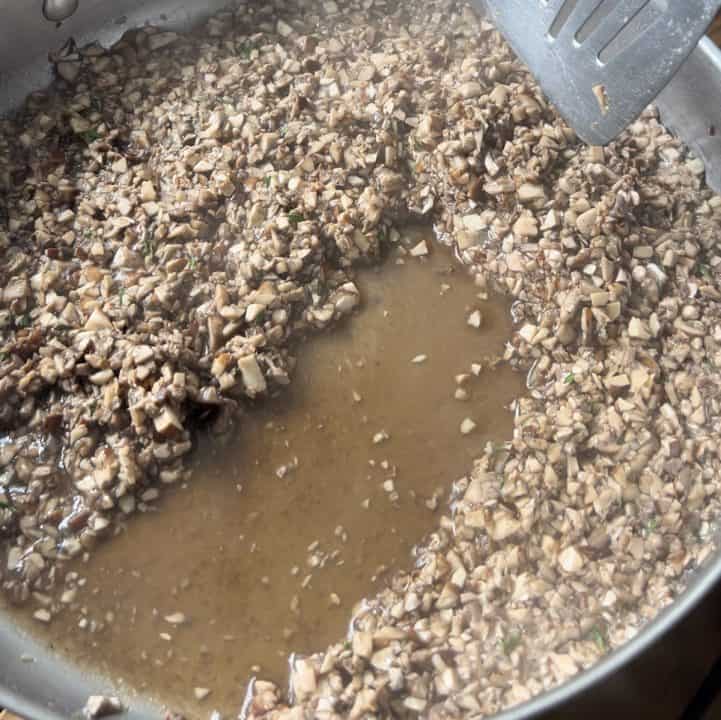
Keep cooking until all of that moisture is gone. Not mostly gone. Gone. The pan should look dry, and the mushrooms should be darker, tighter, and concentrated.
This step matters more than people think. If the duxelles are wet, the Wellington will be too.
Once they are done, set them aside and let them cool completely before assembling anything.
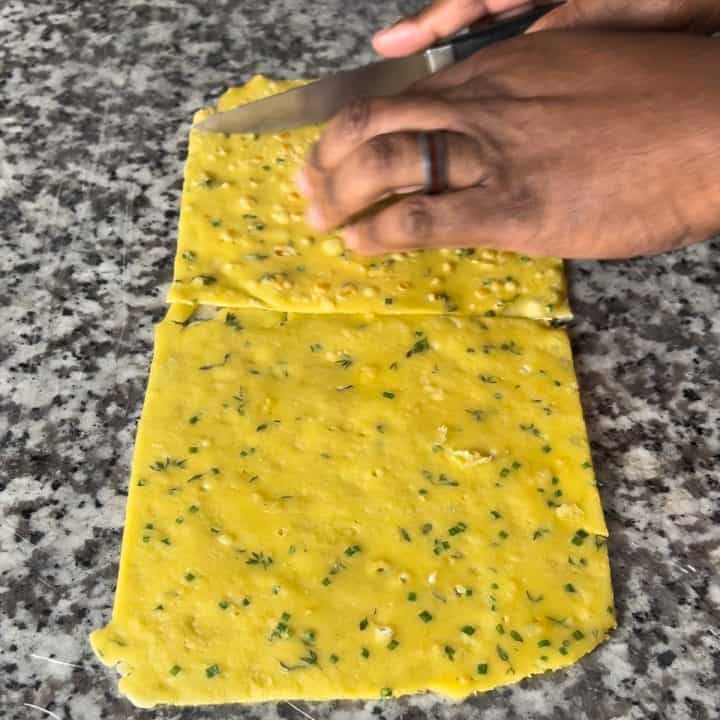
Make the Chive and Thyme Crepes
Whisk together the egg, flour, milk, chives, thyme, and salt until smooth. Chill the batter for at least 30 minutes before cooking.
That rest is important. It gives the flour time to hydrate and helps the batter settle into something smoother and easier to work with.
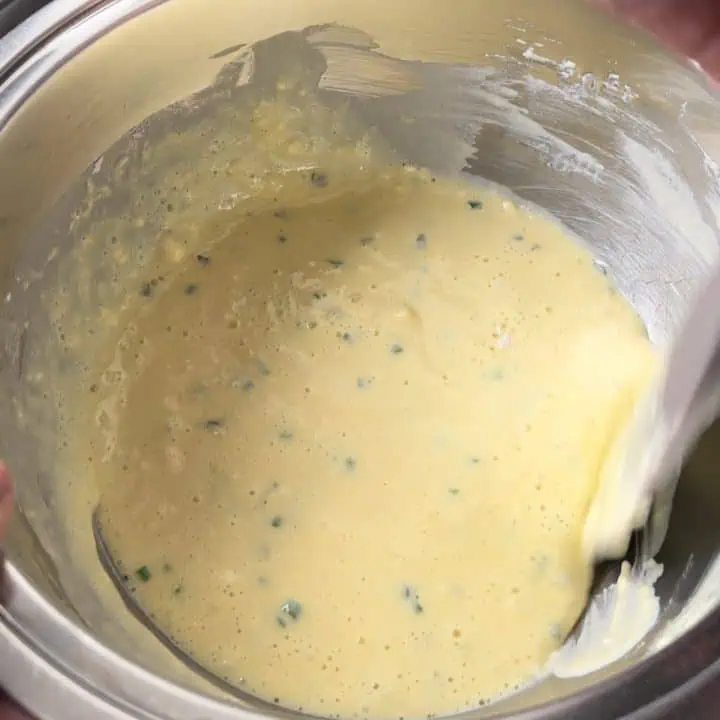
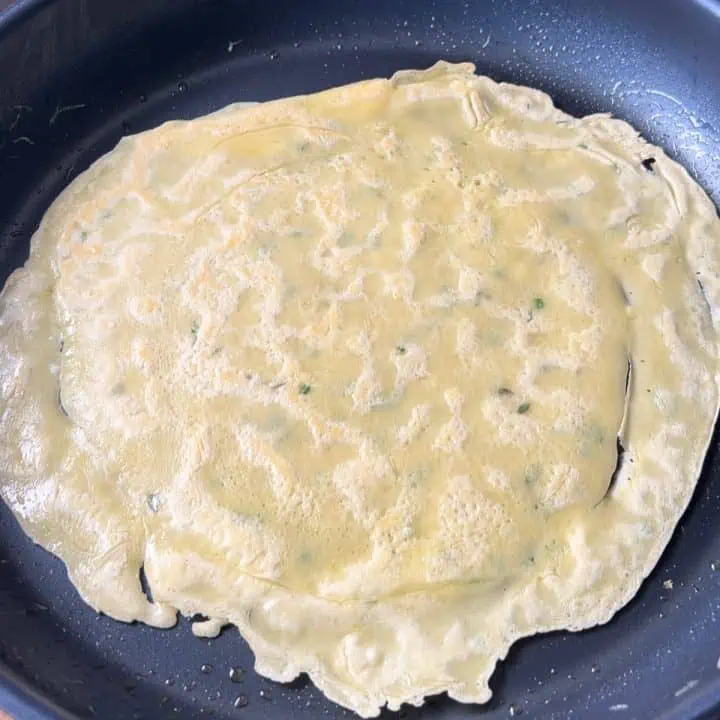
When you are ready to cook, heat a nonstick pan over low heat and lightly coat it with cooking spray. Add about ¼ cup of batter and immediately swirl it into a thin, even layer. Cook until just set, about 25 to 30 seconds, then flip and cook for just a few more seconds.
These crepes should stay pale, not browned.
They are not here to steal the show. They are here to do a job. Thin, light, and dry is exactly what you want.
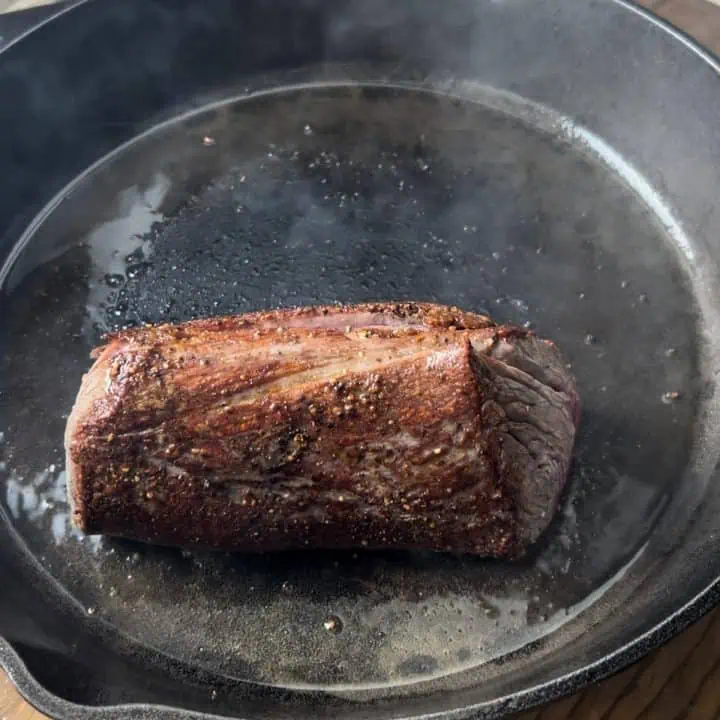
Sear the Beef Hard
Remove the plastic wrap from the chilled tenderloin and pat the beef dry. Season all sides with the salt and pepper.
Heat a cast iron skillet over high heat until it is smoking hot. Add the grapeseed oil, then sear the beef on every side, including the ends, for about 60 seconds per side.
Do not baby it. The goal here is a hard sear on the outside while the center stays essentially raw.
Once it is seared, transfer the beef to a tray and pour any juices from the pan over it.
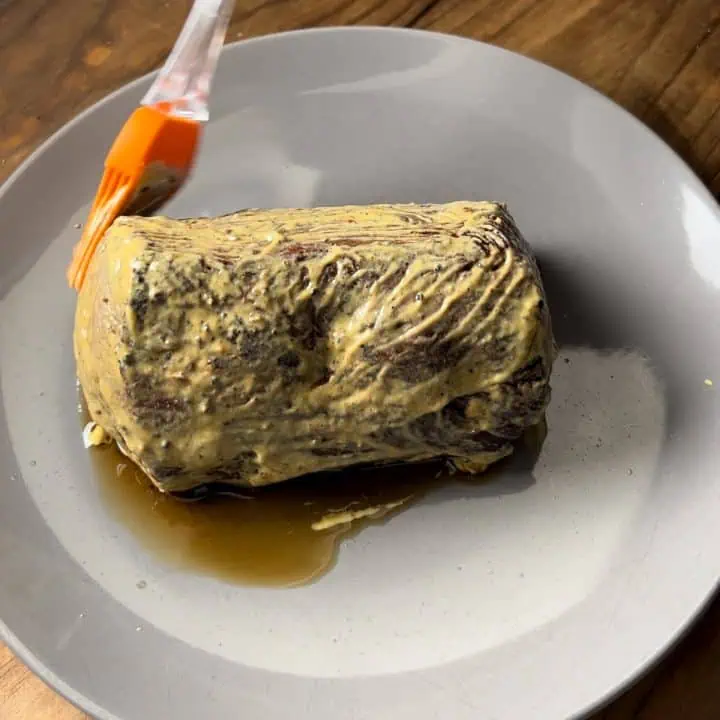
Brush with Mustard While It Is Hot
While the beef is still hot, brush it all over with Dijon mustard.
This is one of those details that seems small until you leave it out. The mustard gives the whole Wellington some much-needed sharpness. Without it, the beef, mushrooms, prosciutto, and pastry can all start leaning heavy.
And while the beef is still hot, the mustard clings better and settles into the surface instead of just sitting on top.
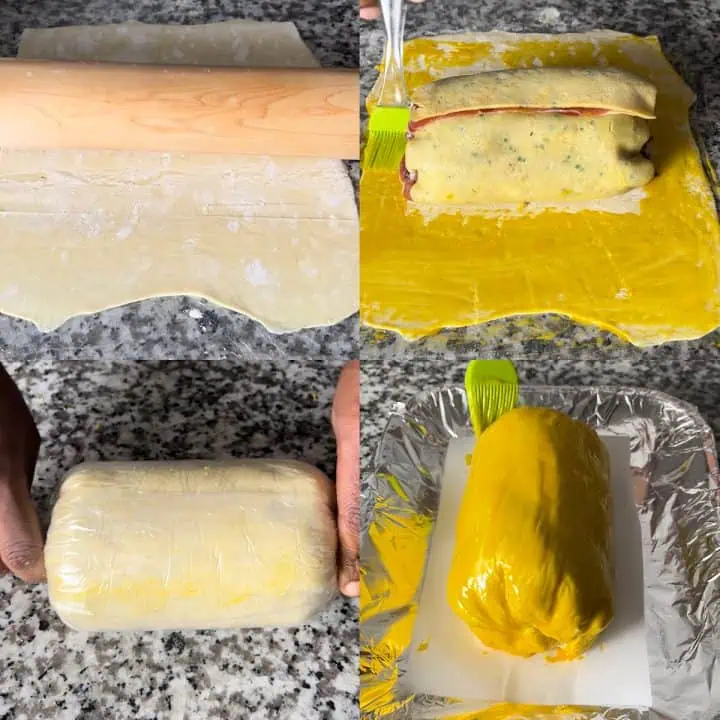
Build the First Wrap
Now you are going to assemble the Wellington in reverse so that once it is rolled, the final layering order is beef, mushrooms, prosciutto, crepe, puff pastry.
Moisten your work surface with a damp towel so the plastic wrap stays put. Then lay out three overlapping pieces of plastic wrap.
Trim 2 crepes into squares that match the length of the beef and lay them on the plastic wrap. Arrange the prosciutto over the crepes, overlapping slightly so you get solid coverage. Spread the cooled mushroom duxelles evenly over the prosciutto.
Then place the mustard-coated beef in the center.
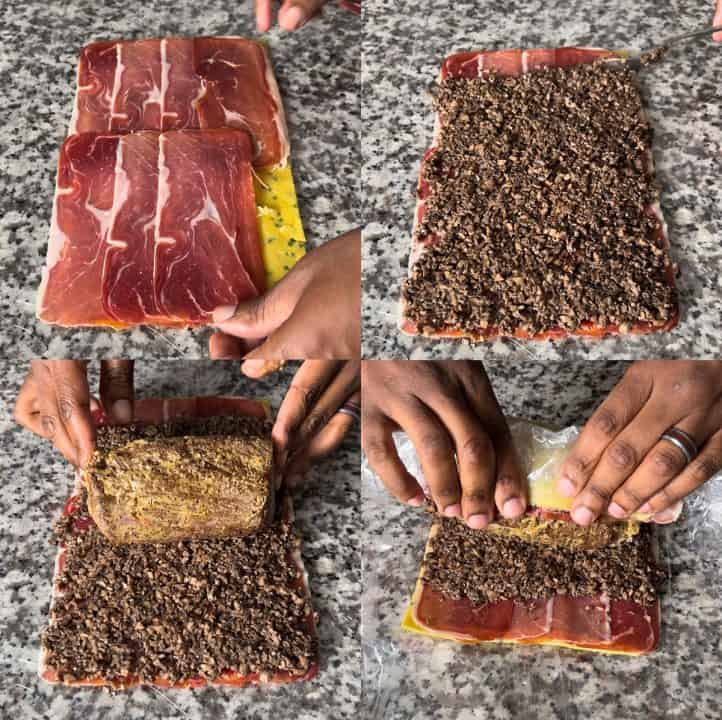
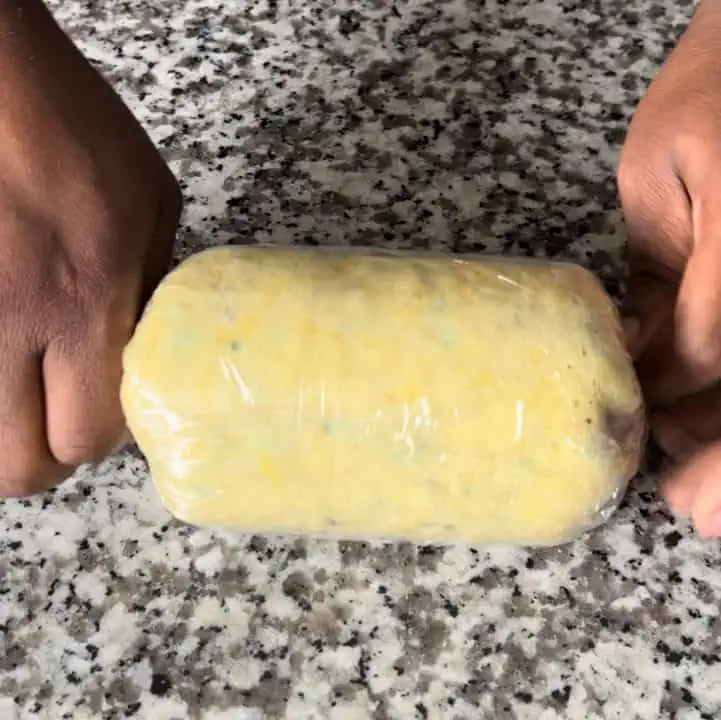
Using the plastic wrap, roll everything tightly around the beef into a neat cylinder. Twist the ends of the plastic wrap to secure it, then refrigerate for 20 minutes.
That chill helps the whole thing firm up before it goes into the pastry.
Wrap in Puff Pastry
Moisten the cutting board again and lay out three more overlapping pieces of plastic wrap. Roll the puff pastry into an ⅛-inch-thick rectangle large enough to fully wrap the beef.
Place the chilled beef roll in the center lengthwise. Brush the pastry edges with egg wash, then use the plastic wrap to help roll the pastry tightly around the Wellington. Keep the seam on the bottom.
Return it to the refrigerator for about 30 minutes so the pastry can firm up again.
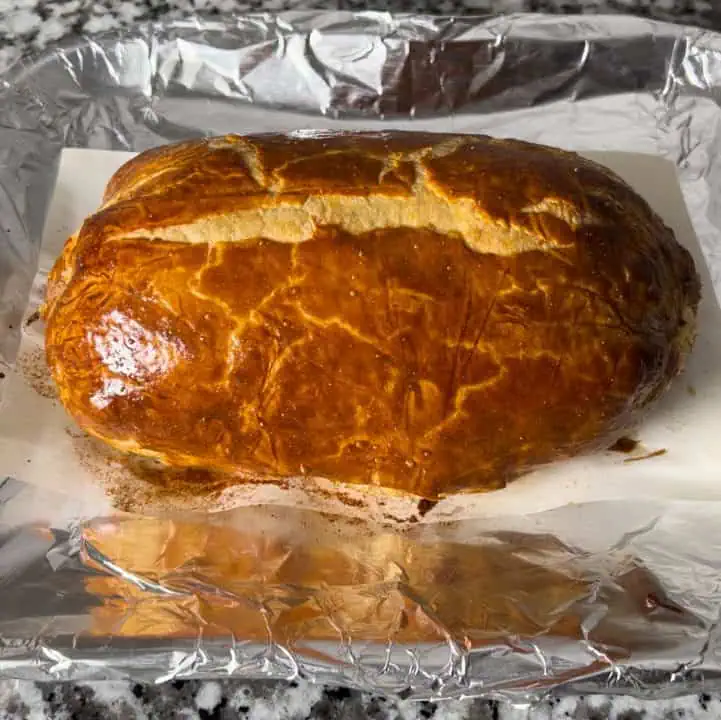
When you are ready to bake, unwrap the Wellington, brush the outside all over with egg wash, and place it seam side down on a parchment-lined baking tray.
Bake Until Golden and Cooked Through
Preheat the oven to 425°F if using convection, or 450°F in a regular oven.
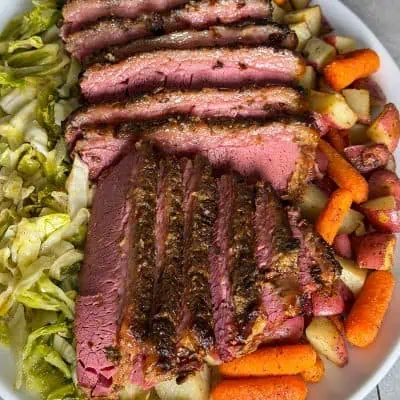
Bake until the pastry is deeply golden and the center reaches 135°F for medium-rare. Depending on your oven and the starting temperature of the beef, that can take anywhere from 20 to 40 minutes.
This is one of those times when both color and temperature matter. You want a pastry that looks finished and a center that lands where you want it.
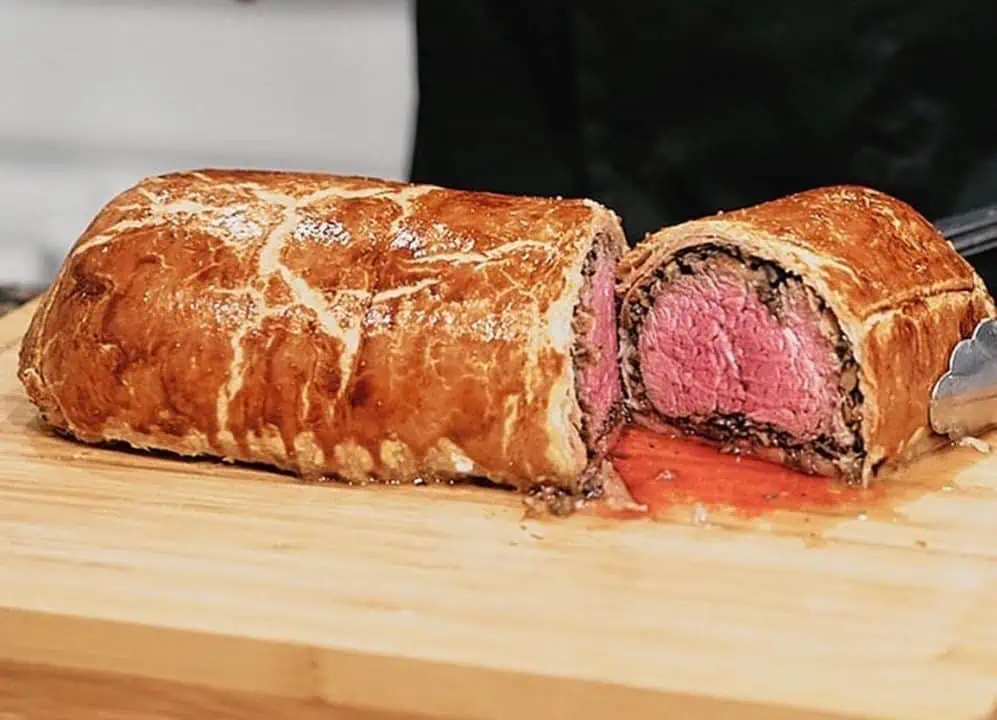
Rest Before Slicing
Once it comes out of the oven, let it rest for 15 to 20 minutes before slicing.
That rest gives the juices time to settle and the layers time to set. Cut too early and the slices will start to lose their structure. In fact, the photo here is from one I sliced a little too soon.
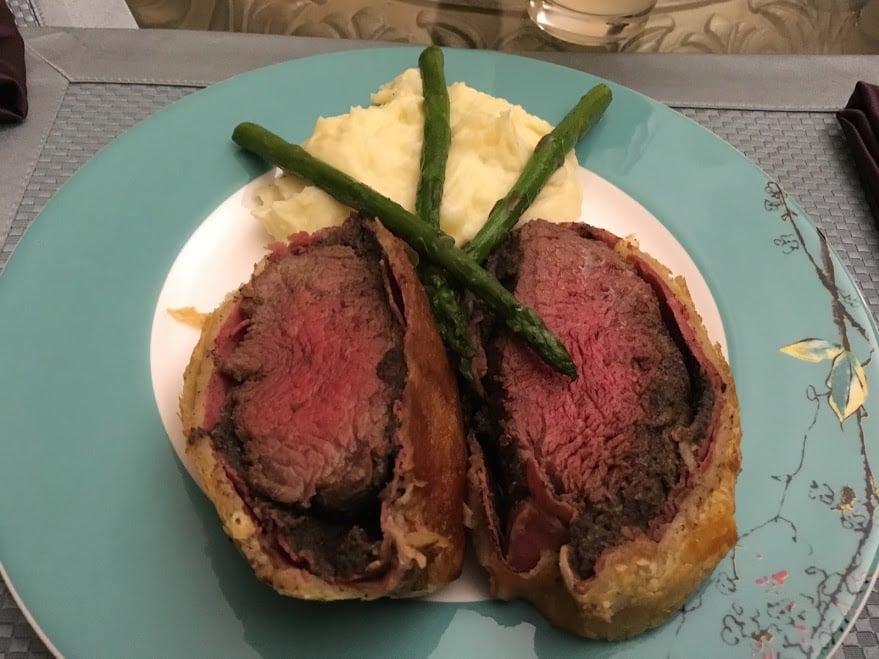
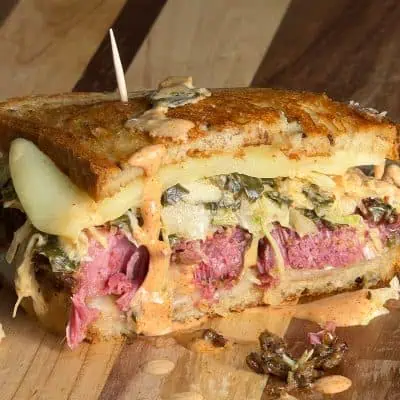
Use a sharp serrated knife and slice into thick portions, about 1 inch each, so you can actually see the layers you worked for.
The Key Success Factors at a Glance
- Shape and chill the beef before you start
- Cook the duxelles until the pan is dry
- Let the crepe batter rest before cooking
- Keep the crepes thin and pale
- Sear the beef hard on all sides
- Brush with mustard while the beef is still hot
- Layer in the correct order: beef, mushrooms, prosciutto, crepe, then puff pastry
- Chill after the first wrap and again after the pastry wrap
- Bake until the center reaches 135°F
- Rest 15 to 20 minutes before slicing
Frequently Asked Questions
Usually because of moisture. The most common causes are wet duxelles, crepes that are too thick, or not enough chilling between wraps.
Yes, and it is a smart move for holidays or dinner parties. You can assemble the whole thing ahead and freeze it. For that workflow, see my Make-Ahead Beef Wellington guide.
Use a center-cut beef tenderloin. A consistent shape makes wrapping easier and helps it cook more evenly.
Bake until the center reaches 135°F for medium-rare, then let it rest 15 to 20 minutes before slicing.
A little. The chives and thyme do come through. But the main reason it is there is structure and moisture control.
Yes. All-butter puff pastry is the best choice if you can find it.
Did You Make This?
If you made this Beef Wellington, I hope you are feeling a little proud right now.
This is not a throw-it-together kind of recipe. It takes intention. But when it works, it really works.
If you share yours, tag me so I can see it. I would love to see your layers, your crust, and your take on it.
📖 Recipe

Gordon Ramsay Beef Wellington
Ingredients
Mushroom Duxelles
- 2 Tbsp. olive oil
- 16 oz. baby bella mushrooms finely diced
- 1 tsp. sea salt
- ½ tsp. black pepper
- 1 tsp. thyme leaves
Crepes
- 1 large egg
- ½ cup all-purpose flour
- ½ cup milk
- ½ tsp. chives finely chopped
- ½ tsp. thyme leaves
- ¼ tsp. sea salt
Wellington
- 1 lb. center-cut beef tenderloin
- 2 tsp. sea salt
- 1 tsp. black pepper
- 2 Tbsp. grapeseed oil
- 2 Tbsp. Dijon mustard
- 8 prosciutto slices
- 1 puff pastry sheet thawed
- 4 egg yolks
Instructions
- Prep the Beef Tenderloin: Wrap the beef tightly in a triple layer of plastic wrap, shaping it into a neat cylinder. Refrigerate overnight if possible, or at least 30 minutes.
- Make the Mushroom Duxelles: Heat the olive oil in a pan over medium heat. Add the finely diced mushrooms, then season with salt, pepper, and thyme. Cook until all the moisture has released and fully evaporated. The pan should look dry. Set aside and let cool completely.
- Make the Chive Crepes: In a large bowl, whisk together the egg, flour, milk, chives, thyme, and salt until smooth. Refrigerate the batter for at least 30 minutes. Heat a nonstick pan over low heat and lightly coat with cooking spray. Add ¼ cup batter, swirling it into a thin layer. Cook for 25 to 30 seconds until just set, then flip and cook for a few more seconds. Keep the crepes pale, not browned. Repeat as needed.
- Sear and Season the Beef: Remove the plastic wrap and pat the beef dry. Season all sides with salt and pepper. Heat a cast iron skillet over high heat until smoking hot. Add the grapeseed oil, then sear the beef on all sides, including the ends, for 60 seconds per side. Transfer to a tray, pour any juices from the pan over it, and brush all over with Dijon mustard while still hot.
- Assemble the First Wrap: Moisten your work surface and lay out three overlapping pieces of plastic wrap. Trim 2 crepes into squares that match the length of the beef and lay them on the plastic wrap. Arrange the prosciutto over the crepes, then spread the cooled duxelles evenly over the prosciutto. Place the beef in the center. Using the plastic wrap, roll everything tightly into a cylinder. Twist the ends to secure and refrigerate for 20 minutes.
- Wrap in Puff Pastry: Lay out three more overlapping pieces of plastic wrap. Roll the puff pastry into an ⅛-inch-thick rectangle. Place the chilled beef roll in the center lengthwise. Brush the pastry edges with egg wash, then roll the pastry tightly around the Wellington, keeping the seam on the bottom. Refrigerate for 30 minutes.
- Bake the Wellington: Preheat the oven to 425°F convection or 450°F regular bake. Unwrap the Wellington, brush all over with egg wash, and place seam side down on a parchment-lined baking tray. Bake until the pastry is deeply golden and the center reaches 135°F for medium-rare, about 20 to 40 minutes depending on your oven and the starting temperature of the beef.
- Rest and Slice: Let the Wellington rest for 15 to 20 minutes before slicing. Use a sharp serrated knife to cut into thick slices, about 1 inch each.
- Heat a cast iron skillet over high heat until it’s smoking hot. Add a little oil with a high smoke point (such as avocado or grapeseed oil). Place the beef in the pan and sear each side for 60 seconds, including the ends.
- Once seared, transfer the beef to a tray and pour any juices from the pan over it. While the beef is still hot, brush it all over with Dijon mustard. Set aside to rest.
Assemble the Wellington
- Moisten a cutting board with a damp towel, then layer three pieces of plastic wrap, overlapping them. Trim 2 crepes into squares that match the length of your beef, and lay them out on the plastic wrap.
- Next, evenly lay slices of prosciutto over the crepe. Ensure the slices overlap slightly to create a solid layer to hold the beef and mushrooms in place.
- Evenly spread the cooled mushroom duxelles over the prosciutto.
- Using the plastic wrap, roll the beef tightly in the crepes, prosciutto, and mushrooms to form a neat package. Twist the ends of the plastic wrap to secure it, and chill in the fridge for 20 minutes.
Wrap in Puff Pastry
- Moisten the cutting board again and lay out three pieces of plastic wrap. Using a rolling pin, roll the puff pastry into an ⅛-inch-thick rectangle.
- Once the pastry is rolled out, carefully place the wrapped crepe roll in the center. Position it lengthwise, allowing enough pastry on either side for wrapping.
- Brush the edges of the pastry all around with an egg wash (a mixture of beaten egg and a splash of water).
- Using the plastic wrap, carefully roll the puff pastry around the crepe and beef, forming a tight cylinder. Ensure that the seam is on the bottom to maintain an elegant presentation. After rolling, let the wrapped Wellington chill in the refrigerator for about 30 minutes.
- Once chilled, take the Wellington out of the refrigerator and carefully unwrap it from the plastic wrap. Brush the entire exterior of the puff pastry with the egg wash. This step is essential for achieving a beautiful, golden-brown color as it bakes.
Baking, Resting, and Slicing
- Preheat your oven to 425°F for convection or 450°F for a regular oven.
- Transfer the Wellington to a baking tray lined with parchment paper. This prevents sticking and allows for even cooking.
- Place the tray in a preheated oven at 425°F (220°C). Bake until the internal temperature reaches 135°F (57°C) for medium-rare. This can take anywhere from 20 to 40 minutes, depending on your oven and the starting internal temperature of the beef.
- Remove the Wellington from the oven and allow it to rest for at least 15 to 20 minutes. If desired, you can lightly cover the Wellington with aluminum foil during the resting period to keep it warm. Be careful not to wrap it too tightly, as this can trap steam and soften the pastry.
- After resting, use a sharp, serrated knife to slice the Wellington into even portions. Aim for about 1-inch thick slices to showcase the beautiful layers of beef, mushrooms, prosciutto, and pastry.
Video
Notes
- For the best shape, chill the wrapped beef overnight before searing. If needed, 30 minutes will still help.
- The duxelles must be cooked completely dry or the pastry can turn soggy.
- The crepes should stay thin and pale, not browned.
- Bake until the center reaches 135°F for medium-rare, then rest 15 to 20 minutes before slicing.
- For a make-ahead option, see the blog post for freezing and bake-from-frozen instructions.
Corrine
Yum!!! Now, when can I host a dinner party?!
Chef Gary
Call me. Let's look at our calendars!
Pirate Chef
Wow man, looks awesome! Nice work on a hard dish! I've eaten it, but never attempted to cook it myself, it's sooooo fancy! I can't wait to see what's next!
Chef Gary
Thanks man. We still need to get you over here for dinner!
Cara Jae
Yummm.. looks amazing my talented friend!
Cara Jae
<3
Paige
I've always wanted to try to make that...I just might now. Thanks friend 🙂
Chef Gary
It is a show stopper! Good luck, and please share pics!
Jesse
I just ate lunch...read this article...drooled over the pictures...now, I am hungry again...as if I did not just eat 5 minutes ago. YUMMMMMYYYY
Chef Gary
? you're welcome!
Matthew
This thing was magical! Dare I say better than a plate of hot, crispy, greasy bacon? Yes, yes we are! Top notch Chef Gary! Keep them coming?
Jesse
Soooo...can we schedule a "dinner party" at my house on Thursday, November 23rd and Sunday, December 25th? LOL!
Chef Gary
I don’t know if you’re ready to pay the tax on those dates. ? However, we can schedule something else...
Morgan
Where is the recipe ?
Marianne
Waiting on the recipe................ ????
Marianne
Is there a recipe online for the Gordon Ramsay Beef Wellington?
Gary
Hi Marianne. In the post I link to this recipe: https://www.gordonramsay.com/gr/recipes/beef-wellington/ . However, the point of the post is to share that there is a step missing that they only share in the Master Class course; the crepe. Out of respect for Gordon Ramsay, I will not repost his recipe here, but you can find the recipe he has made public at the above link.
Marianne
If this is a duplicate QUESTION.... What is the ANSWER?
Solveig
What sort of crepe?
Gary White
Just a basic, simple crepe. I did add thyme to mine though.
Nisha
Can this recipe be prepared without using the parma ham? My guests don't eat pork.
Gary White
You could certainly switch out for different deli meat. One that has a big flavor, maybe like turkey pastrami?
Andrea
Wow. Great instructions. This is our favourite holiday meal. .
Katie Vaccaro
This was absolutely amazing. My second attempt at Welly's and they were perfect! The thyme and chive crepe was exactly what I missed last year!