Key lime pie ➝ zesty punch
Cheesecake ➝ creamy goodness
Lime curd ➝ silky smooth
= Gluten-free key lime bars
Bright. Rich. Downright addictive.
Basically everything I love about citrus desserts...
layered into one dreamy bar.

This post may contain affiliate links. If you click and make a purchase, I may earn a small commission at no extra cost to you. As an Amazon Associate, I earn from qualifying purchases. Read my full disclosure here.
The Story: From Lemon to Lime
Take everything you love about citrus desserts...
bright, tangy, rich, and creamy...
and layer it into one ridiculously good bar.
That’s exactly what these are:
Gluten-Free Key Lime Bars
with a buttery graham cracker crust, a baked cheesecake center,
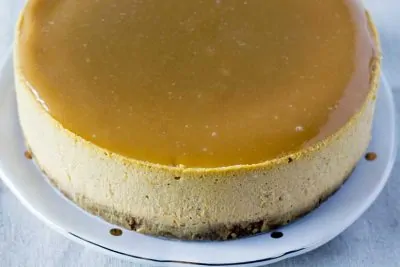
and a glossy lime curd topping that steals the show.
The idea started at a retirement dinner I was hired to cook.
The guest of honor loved lemon,
so I made a lemon cheesecake that ended up being the hit of the night.
(Well… second only to the Beef Wellington.)
That dessert stuck with me.
Fast forward a few months.
My wife casually mentioned she hadn’t had key lime pie in forever.
She’s been gluten-free for nearly a decade,
so yeah… it’s been a minute.
Naturally, I did what any decent husband with a mild baking obsession would do...
I grabbed the cream cheese, a questionable amount of limes,
and got to work.
The result? Sunshine. In dessert form.
And since I’ve been leaning more into gluten-free baking lately...
especially desserts...
I’ve got a whole collection of gluten-free recipes to explore when you’re done here.
Why These Hit Different
- Classic key lime flavor. Leveled up with cheesecake and real lime curd.
- Buttery crust. Creamy center. Bright, glossy finish.
- Make-ahead friendly. Easy to slice.
- Schar Honeygrahams. That real graham cracker crunch.
- Baked in a loaf pan for clean cuts. Or 8x8 if that’s what you’ve got.
- Made for my wife. Tested by me. Approved by everyone.
What You'll Need
Everyday ingredients. Nothing fancy. (I grabbed everything at Walmart.)

How to Make Gluten-Free Key Lime Bars
1. Prep the Pan
- Grease a 12x4 or 8x8 pan.
- Line with parchment (leave overhang).

I know, I know... real bakers use offset spatulas. But I’ve been using the back of a teaspoon for all kinds things for years (even frosting cakes!). It gets the corners, spreads the curd, and makes me feel slightly rebellious. Call it culinary minimalism, or just my secret weapon for perfectly pressed crusts.
Want to be fancy? Here’s the offset spatula I probably should’ve used.
2. Make the Crust
- Crush crackers into fine crumbs.
- Stir in melted butter and sugar.
- Mix until it holds shape (like wet sand).
- Press evenly into the pan.
- Use a spoon or glass.
- (or offset spatula like normal people)

3. Mix Cheesecake
- Beat cream cheese, sugar, zest, juice, and vanilla (15 sec).
- Add eggs. Mix on low until just combined.
- Tap bowl on counter 3x (to release air).
- Pour over crust. Smooth it out.
4. Bake
- Bake at 275°F for 40–45 min.
- Edges should be firm. Center should jiggle slightly.
- Start curd while cheesecake bakes.
5. Make Lime Curd
- Add all curd ingredients to saucepan.
- Cook over medium-low, whisking constantly.
- When thick and nearly bubbling, remove from heat.
- Strain into bowl.
- Cover with plastic wrap (touching surface).
- Chill until cooled—not cold.
If you pour it on while warm, it will mix into the cheesecake and create a swirl effect (ask me how I know...).

6. Add Curd, Bake Again
- Cool cheesecake 10 min (it’ll flatten).
- Spoon curd on top.
- Spread gently and evenly.
- Bake 5 min more (just to set curd).
7. Cool and Chill
- Turn off oven.
- Crack door.
- Let bars cool inside 2 hours.
- Then cool on counter 1 hour.
- Chill in fridge 5+ hours (or overnight).
Shortcut note: I’ve refrigerated them after just 1.5 hours of cooling in the oven, and they turned out great, but the curd may crack or lose that ultra-smooth look.

8. Slice and Serve
- Lift bars using parchment.
- Cut with hot knife, wiping between slices.
- Serve cold or let sit 15–20 min for softer texture.
Pro Tips for Perfect Gluten-Free Key Lime Bars
- Try a 12x4 bread pan if you want extra clean, even slices.
- Rinse and reuse your spoon! It's perfect for both pressing crust and spreading curd.
- Philadelphia cream cheese is the move for that super smooth filling.
- Don’t rush the cooling unless you’re okay with a less polished appearance.
- Strain the curd. Always. It’s essential for the right texture and flavor.
Gluten-Free Key Lime Bars: FAQs
Yep... wrap tight and freeze up to 2 months. Thaw overnight in the fridge.
Yes. It keeps the texture smooth and the flavor clean. Don’t skip it.
Lemon and lime swap easily. Orange might work, but I haven’t tried it.
About 5 days in the fridge. The curd may lose some shine after day 3.
Want More Cheesecake?
If you’re into cheesecakes, don’t miss these Instant Pot favorites:
- Instant Pot Bailey's Irish Cream Cheesecake
- Instant Pot Pumpkin Cheesecake with Maple Glaze
- Instant Pot Chocolate Cheesecake
- Instant Pot White Chocolate Strawberry Cheesecake
- Instant Pot Peppermint Bark Cheesecake
- Instant Pot Gingerbread Cheesecake
- More Desserts →
All gluten-free friendly!
More Gluten-Free Recipes
My garden of gluten-free recipes is blooming. You can check them out here.
Ready to give these gluten-free key lime bars a try?
The full recipe is just below.
Make it. Rate it. Let me know!
📖 Recipe

Gluten-Free Key Lime Bars
Equipment
- 12 x 4 (or 8 x 8) metal loaf pan
Ingredients
For the Crust
- 5 oz. (140 g) Schar Honeygrahams (or other gluten-free graham-style cracker)
- 7 Tbsp. (100 g) butter melted
- 2 Tbsp. (24 g) granulated sugar
For the Cheesecake Filling
- 16 oz. (450 g) Philadelphia Cream Cheese softened, at room temperature
- ¾ cups (150 g) granulated sugar
- 1 tsp. (5 ml) vanilla extract
- 2 (100 g) large eggs at room temperature
- 1 Tbsp. (6 g) lime zest
- 2 Tbsp. (30 ml) lime juice
For the Lime Curd Topping
- ½ cup (120 ml) lime juice
- 2 Tbsp. (12 g) lime zest
- ½ cup (100 g) granulated sugar
- 2 (100 g) large eggs
- 2 ½ Tbsp. (35.5 g) butter
Instructions
Preparing the Pan & Crust
- Preheat oven to 275°F. Lightly grease your baking dish, then line it with parchment paper, leaving a 2-inch overhang for easy lifting. Greasing first helps the paper stay put.
- Crush the crackers into fine crumbs using a food processor or by placing them in a Ziplock bag and using a rolling pin. Add the melted butter and sugar, then mix until it resembles moist, packed crumbs. It should look like wet sand that just holds its shape.
- Press the mixture evenly into the bottom of your prepared pan. Use the bottom of a drinking glass or a teaspoon for getting into the corners. Rinse the spoon and set it aside; you’ll use it again.
Cheesecake Filling
- In a large bowl, beat the cream cheese, lime zest, lime juice, vanilla, and sugar for about 15 seconds on medium-high speed until it's smooth.
- Add the eggs and mix on low just until combined. Do not overmix!
- Tap the bowl firmly on the counter 3 times to bring air bubbles to the surface.
- Pour the filling over the crust and use the back of your clean spoon to smooth the surface.
Baking the Cheesecake Layer
- Bake for 40–45 minutes. You’re looking for firm edges and a slight jiggle in the center (think set Jell-O, not soup).
- While the cheesecake bakes, proceed to make the lime curd.
Homemade Lime Curd
- Add all curd ingredients (lime juice, zest, sugar, eggs, and butter) to a small saucepan. Cook over medium-low heat, whisking gently but constantly.
- Continue whisking until the curd starts to thicken rapidly, within seconds. Stay with it and keep whisking.
- Once thick and nearly bubbling, remove from heat and immediately strain through a fine mesh sieve into a bowl.
- Cover with plastic wrap, pressing it directly onto the surface. Refrigerate until cooled down (not necessarily cold, but no longer warm).
Assembling & Finishing
- Once the cheesecake is done, let it cool for 10 minutes to flatten out.
- Gently spoon the cooled (not cold) curd over the top and spread it evenly. Return the pan to the oven and bake for 5 more minutes to help the curd set.
- Turn off the oven, crack the oven door, and let the bars cool inside for 2 hours. This helps prevent cracking and allows the curd to firm up.
- Then let the bars cool on the counter for 1 hour, and refrigerate for at least 5 hours (preferably overnight).
Serving
- Use the parchment overhang to lift the bars from the pan.
- Slice using a sharp knife rinsed under hot water and wiped clean between each cut. For best texture, slice the bars while cold, then let them sit at room temperature for 15-20 minutes before serving if a slightly softer bite is preferred.
Video
Notes
- You’ll need 6–9 limes, depending on size and juiciness. Zest before juicing, and avoid the bitter white pith.
- If you run short on fresh juice, bottled lime juice works in a pinch.
- Lemon and lime can be used interchangeably—orange might work too, but it’s untested.
- A teaspoon works surprisingly well in place of a glass or spatula for pressing crust and spreading curd.
- If you pour it on while warm, it will mix into the cheesecake and create a swirl effect.
- Bars can be stored in the fridge up to 5 days or frozen for up to 2 months.
- Shortcut Note: I’ve refrigerated them after just 1 ½ hours of cooling in the oven, and they turned out great, but the curd may crack or lose that ultra-smooth look.
- Straining the curd is not optional! It removes bits of zest or egg for a smooth texture.
Nutrition
Need more gluten-free treats?
I’ve got a whole stash right here →
Still thinking about cheesecake?
Try my Bailey’s Irish Cream Cheesecake—creamy, rich, Instant Pot magic. Grab the recipe →
And hey… if you make these bars, drop a comment and let me know.?
And even if you eat the whole batch. No judgment.



Rebecca Warfield
According to my husband this is the best thing he's ever eaten! I know I'll be making it a lot from now on because it really is one of the best deserts I've ever had!