Forgot to thaw the roast. It is 3pm. Dinner is at 6. The Instant Pot is your best friend right now. This is the exact method for turning a completely frozen chuck roast into fall-apart, gravy-rich beef — no thawing required, no shortcuts that cost you texture. Just pressure, time, and a little patience on the back end.
Want to compare all the methods? Start with my full guide to pot roast recipes.
Real Talk
Frozen pot roast in the Instant Pot actually works. The result will not be identical to a properly seared, thawed roast — you lose the crust and some of that deep, caramelized flavor — but the beef will still be fork-tender and the gravy will still be good. For a forgot-to-thaw situation, that is a genuine win.
One thing to get out of the way: do not put a frozen roast in the slow cooker. It takes too long to heat through, which means the meat spends too much time in the temperature danger zone where bacteria multiply.
Why This Recipe Works
- Pressure cooking moves heat through the meat evenly. Frozen meat cooks slowly from the outside in — the center takes the longest to come up to temperature. The Instant Pot's pressurized environment solves this by driving heat through the roast faster and more evenly than an oven or slow cooker ever could.
- The sealed environment keeps the meat from drying out. There is nowhere for moisture to escape. The roast steams and braises simultaneously, which is exactly what a tough cut like chuck needs.
- Chuck roast is built for this. The fat and connective tissue in a chuck roast break down under heat and moisture and become the flavor. Starting from frozen just means giving it more time to get there.
What You Need
Ingredients
- Frozen chuck roast, 3 to 5 lbs
- Kosher salt and black pepper
- Beef broth, at least 1 cup
- Yellow onion, roughly chopped
- Garlic, 3 to 4 cloves
- Bay leaf
- Fresh or dried thyme
- Dry red wine, optional but recommended
- Carrots and potatoes, cut into large chunks (optional — added in a second cook)
How to Cook Frozen Pot Roast in the Instant Pot
Step 1: Season and place the roast
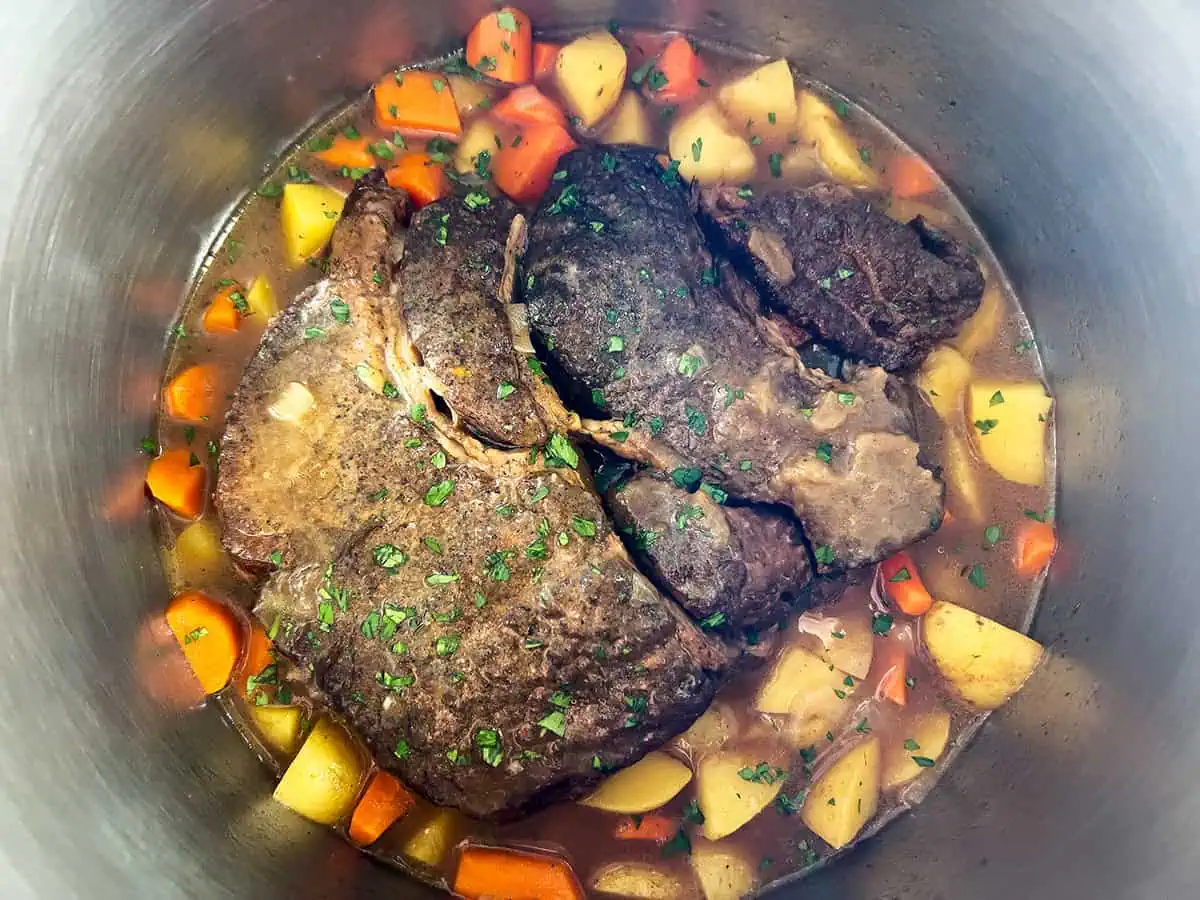
Place the frozen roast directly in the Instant Pot insert. Season the top and sides as generously as you can with kosher salt and black pepper. It will not absorb the seasoning the way a thawed roast would, but get it on there. You will have a chance to adjust after cooking.
Step 2: Build the liquid base
Add the chopped onion, garlic, bay leaf, and thyme around the roast. Pour in at least 1 cup of beef broth — enough to cover the bottom of the pot by about an inch. Add a splash of red wine if you have it. This becomes the base of your gravy. No broth or wine? Use water and an extra pinch of salt. We are in rescue mode — use what you have.
Step 3: Pressure cook on high
Lock the lid and set the valve to sealing. Cook on High Pressure for 90 to 110 minutes depending on the size and thickness of your roast. See the timing chart below.
Step 4: Full natural release
When the cook time ends, do not touch the valve. Let the pressure release naturally for at least 30 minutes. This is not optional. Quick release on a frozen roast that has been under pressure that long will tighten the muscle fibers and cost you the tenderness you just spent two hours building.
Step 5: Remove and rest the roast
Lift the roast out and set it on a cutting board. Let it rest for 10 to 15 minutes while you handle the vegetables and gravy.
Step 6: Cook the vegetables (optional)
Strain the cooking liquid through a fine mesh strainer and return it to the pot. Add large chunks of carrots and potatoes — keep them big, at least 2 inches, so they hold up. Lock the lid and cook on High Pressure for 4 minutes. Quick release.
Step 7: Shred and serve
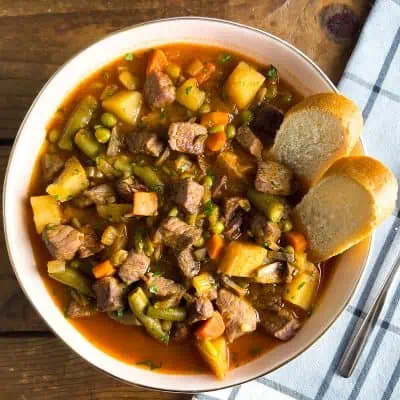
Pull the roast apart with two forks and return it to the pot with the vegetables and gravy. Taste the broth and adjust salt if needed — frozen meat absorbs seasoning differently, so the final taste check matters here. Serve with whatever catches the gravy best.
Timing Chart
| Roast Size | Cook Time (High Pressure) | Natural Release |
|---|---|---|
| 2 to 3 lbs | 85 to 90 minutes | 30 minutes |
| 3 to 4 lbs | 90 to 100 minutes | 30 minutes |
| 4 to 5 lbs | 100 to 110 minutes | 30 minutes |
Thicker roasts need more time than lighter ones of the same weight. When in doubt, go longer.
Never get caught without a plan again. Download the free Pot Roast Kitchen Game Plan — every method, cook time, and grocery list on one page.
How to Tell When It's Done
The roast should pull apart easily with two forks with no real resistance. If it is still holding together and fighting back, lock the lid and give it another 15 to 20 minutes on High Pressure followed by another 15-minute natural release. Do not try to shred it early — the connective tissue needs more time to break down.
If you want to use a thermometer, the internal temperature should read at least 190°F to 200°F for a fork-tender shredding texture. Safe to eat starts at 145°F but that temperature will not give you the pull-apart result you are after.
Serving and Storage
Serve over: mashed potatoes, egg noodles, or rice — anything that catches the gravy. A simple green salad on the side cuts through the richness.
Make gravy from the liquid: Strain the cooking liquid into a saucepan. Bring to a simmer. Whisk in a cornstarch slurry (1 tablespoon cornstarch mixed with 1 tablespoon cold water) and cook until thickened. Taste and season.
Fridge: Store shredded beef in the gravy in an airtight container for up to 4 days. The flavor gets better overnight.
Freeze: Freeze in 2-cup portions with gravy for up to 3 months. Reheat covered on low with a splash of broth.
Got leftovers? Save enough to make Pot Roast Lasagna tomorrow. That move is not optional.
Expert Tips
- Skip the sear. A frozen roast will not brown — it will just steam. Do not bother. Build flavor through aromatics and liquid instead.
- Use hot broth if you have it. Starting with warm liquid helps the pot come to pressure faster.
- Keep vegetables in large chunks. Smaller pieces will turn to mush in a second pressure cook. Two-inch chunks hold up.
- Natural release is non-negotiable. The full 30 minutes matters. Do not shortcut it.
- Taste and season after opening. Frozen meat absorbs seasoning differently. The final taste check is where you dial it in.
- If it is not tender, cook it longer. Lock the lid, add 15 to 20 more minutes on High Pressure, and give it another natural release. It will get there.
FAQs
Plan for 90 to 110 minutes on High Pressure depending on size, followed by a full 30-minute natural release. A 3 to 4 lb roast needs about 90 to 100 minutes. A 4 to 5 lb roast needs closer to 110. When in doubt, go longer.
No. Frozen meat in a slow cooker spends too long in the temperature danger zone before it heats through. The USDA recommends against it. The Instant Pot is the right tool for this situation.
No. That is the whole point of this method. The Instant Pot brings the internal temperature up fast enough that you clear the food safety window without a problem.
Close, but not identical. You skip the sear, which costs some depth. The texture and tenderness will still be there. For a forgot-to-thaw situation it is absolutely worth making.
Lock the lid and add 15 to 20 more minutes on High Pressure, then do another natural release. The connective tissue just needs more time. It will get there.
Technically yes, but it is not the move here. The oven heats unevenly from the outside in, which means the exterior overcooks before the center catches up. The Instant Pot solves this problem entirely.
More Pot Roast Recipes You’ll Love
- Instant Pot Pot Roast — the full from-scratch version with a sear, red wine, and homemade gravy.
- Crock Pot Pot Roast with Cream of Mushroom Soup — three ingredients, zero stress. Thaw first.
- Slow Cooker Mississippi Pot Roast — no packets, no butter, still hits hard. Thaw first.
- Oven Pot Roast with Red Wine Gravy — dry-brined and next-level. Worth the wait.
- Cream of Mushroom Mississippi Pot Roast — creamy and tangy in the same bite.
- Pot Roast Lasagna — what to do with the leftovers tomorrow.
- All Pot Roast Recipes — every method, side by side.
★ Did you make this frozen pot roast?
Please give it a star rating below! ★
📖 Recipe

How to Cook a Frozen Pot Roast
Ingredients
- Frozen chuck roast 3 to 5 lbs
- Kosher salt and black pepper
- 1 cup beef broth plus more as needed
- 1 yellow onion roughly chopped
- 3 to 4 garlic cloves
- 1 bay leaf
- Fresh or dried thyme
- Splash of dry red wine optional
- Carrots and potatoes large chunks (optional)
Instructions
- Place the frozen chuck roast directly in the Instant Pot insert. Season the top and sides generously with kosher salt and black pepper.
- Add the onion, garlic, bay leaf, and thyme around the roast. Pour in at least 1 cup of beef broth. Add a splash of red wine if using.
- Lock the lid and set the valve to sealing. Cook on High Pressure — 85 to 90 minutes for a 2 to 3 lb roast, 90 to 100 minutes for 3 to 4 lbs, 100 to 110 minutes for 4 to 5 lbs.
- When cook time ends, let the pressure release naturally for at least 30 minutes. Do not use quick release.
- Remove the roast and let it rest on a cutting board for 10 to 15 minutes.
- If adding vegetables, strain the cooking liquid and return it to the pot. Add large chunks of carrots and potatoes. Cook on High Pressure for 4 minutes. Quick release.
- Shred the roast with two forks. Return to the pot with the vegetables and gravy. Taste and adjust salt before serving.
Notes
- The roast is done when it pulls apart easily with two forks. If it resists, lock the lid and add 15 to 20 more minutes on High Pressure, then do another 15-minute natural release.
- Skip the sear — a frozen roast will not brown. Build flavor through aromatics and liquid instead.
- Taste and season after opening. Frozen meat absorbs seasoning differently. The final taste check matters.
- Store leftovers in the gravy for up to 4 days in the fridge or 3 months in the freezer.

Leave a Reply