

Most pot roasts are fine.
This one starts the night before.
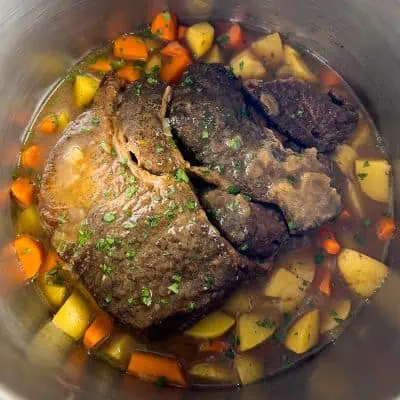
Dry-brine the chuck roast overnight, sear it like you mean it, then braise it low and slow with red wine, fresh herbs, and a built-in gravy that gets better while the beef does its thing.
The result is not just tender beef. It is layered flavor. Deep, rich, and actually worth the extra time.
It takes longer than the Instant Pot version. Costs about the same to put on the table: a $20 chuck roast, some pantry aromatics, a glass of wine from the bottle you were going to open anyway.
Worth it.

Want to compare all the methods? Start with my full guide to pot roast recipes.
Real Talk
When to Make This
This is not the Tuesday pot roast. This is the Sunday pot roast. The one for the weekend when you want dinner to feel like something, not just get on the table.
The ingredients are cheap. The technique is not. You trade a little planning and a little patience for a meal that eats like a restaurant and costs like a grocery run. That is the whole deal.
About That Wine
This is a braise, not a Bordeaux tasting. Don’t overthink the wine.
Use something dry and drinkable. Cabernet, Merlot, or a red blend all work. If it tastes decent in a glass, it will taste even better after a few hours in the pot. No need to spend more than about $12.
Onion Strategy
You could toss in one onion and call it a day.
But trust me, split the difference.
Two get chopped up and sautéed early to build flavor. The other gets sliced and tossed in with the veggies later for that sweet, jammy texture. It is worth the two minutes and the tears.
Why This Recipe Works
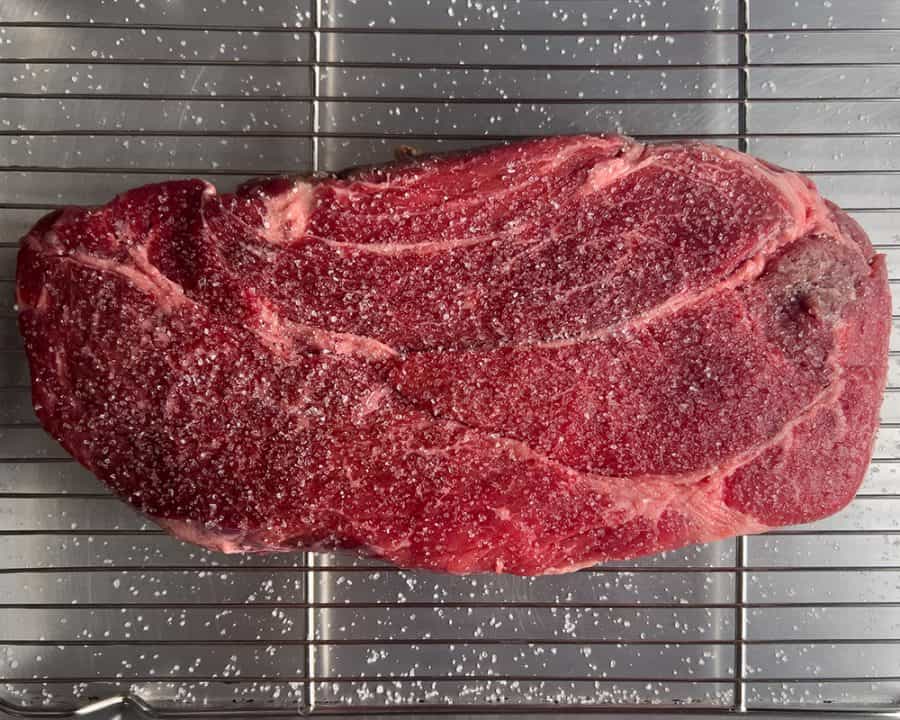
- The dry brine changes the meat. Salt draws out moisture, then the roast pulls it back in. That gives you deeper seasoning all the way through.
- A hard sear builds the base. That crust is not decoration. It is the start of the gravy.
- This is a braise, not a boil. The roast should sit above the liquid, not disappear into it.
- The vegetables go in later. That keeps them tender without turning them soft and sad.
- Cheap cut, big technique. Chuck roast is one of the cheapest cuts at the counter. The dry brine and the long braise turn it into something that eats like a $40 steakhouse special. That is the trade this recipe is built on.
Technique Highlight:
Dry Brine = Big Flavor
Skip the marinades. Salt is enough.
Season the roast the night before and refrigerate it uncovered. The salt pulls moisture to the surface, then the meat reabsorbs it as it rests.
That means the seasoning goes deeper than the outside.
It is not just surface flavor. It changes the roast.
And the only thing it costs you is planning ahead.
What You'll Need

Main Event
- 3½-4 lb chuck roast — dry-brined overnight with 1 tablespoon kosher salt
Flavor Builders
- 2 tablespoon olive oil — for that sear
- 2 yellow onions — quartered
- 3 celery stalks — sliced
- 1 whole garlic bulb — cut in half horizontally
- 8 thyme sprigs
- 1 rosemary sprig
- 2 bay leaves
- 1 teaspoon garlic powder
- 1 teaspoon onion powder
- 1 teaspoon black pepper
Liquid Love
- 1 cup dry red wine — cab or merlot, nothing too sweet
- 2½ cups beef broth — ½ cup reserved for slurry
Veggie Crew (Add Later)
- 1 lb carrots — peeled, cut chunky
- 1½ lbs red or gold potatoes — quartered
- 1 yellow onion — sliced
- 2 tablespoon cornstarch — mixed with ½ cup beef broth for a quick slurry

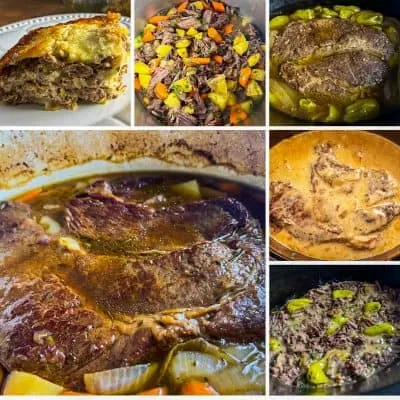
How to Make Oven Pot Roast: Step-by-Step
Step 1: Season + rest
Pat roast dry, salt generously, and refrigerate uncovered overnight. Let sit at room temp while the oven preheats.
Step 2: Sear the roast
Brown the roast in a Dutch oven until deeply seared on both sides. Set aside.

Step 3: Sauté onions
Lower heat. Add onions and scrape up the brown bits as they soften and color.

Step 4: Add aromatics + wine
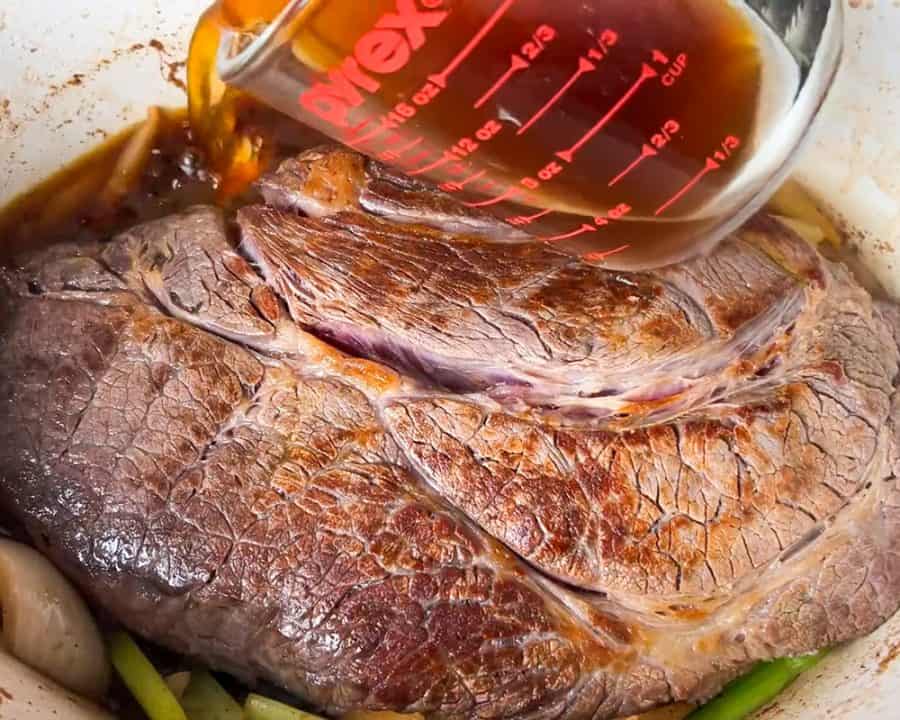
Add celery, garlic, herbs, and seasonings. Sauté a few minutes, then deglaze with wine.

Step 5: Braise low + slow
Nestle roast into the pot with broth. Cover and bake for 3 hours.
Step 6: Strain the liquid
Remove roast. Strain out aromatics and press them to extract every bit of flavor.

Step 7: Squeeze + reduce
Return the strained broth to the pot, rich, dark, and packed with flavor.

Step 8: Thicken the gravy
Whisk in a cornstarch slurry and bring to a simmer.

Step 9: Add veggies + finish braise
Add carrots, potatoes, and onion. Return roast and braise 1 hour more.

Step 10: Shred + serve
Shred the roast in the pot and stir it into the veggies and gravy. Serve hot.

Expert Tips
- Dry-brine the roast overnight if you can. That one step changes the seasoning from surface-level to all the way through.
- Do not rush the sear. A pale roast makes a pale gravy. Let the crust build.
- Press the aromatics when you strain. There is a lot of flavor still hiding in there.
- Add the vegetables later. One hour at the end keeps them tender without turning them soft and sad.
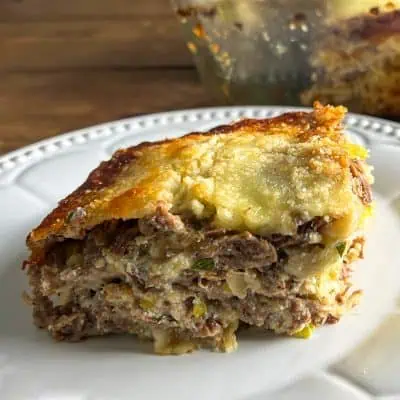
- Got leftovers? Save enough to make Pot Roast Lasagna tomorrow.
FAQs
Yes, but it is one of the biggest flavor upgrades in the whole recipe. If you are short on time, salt the roast and let it sit uncovered in the fridge for as long as you can.
Use a dry red you would actually drink. Cabernet, Merlot, or a red blend all work well. No need to spend big here.
You do not have to, but it makes the gravy smoother and more refined. Pressing the aromatics through the strainer helps keep the flavor while leaving the rough texture behind.
Chuck roast is the best choice here. It has the fat and connective tissue that make pot roast work. Leaner cuts will not give you the same payoff.
Yes. It reheats well, and the flavor deepens overnight. Store the roast, vegetables, and gravy together so everything stays moist.
Technique Highlight:
Don't Skip the Sear
Color equals flavor.
That deep brown crust is non-negotiable.
But here is the real magic: the fond left behind, those crispy brown bits stuck to the bottom of the pot, is where this dish gets its soul. Deglazing lifts it up and melts it into the base. No fond, no flavor. Do not rush it.

More Pot Roast Recipes You'll Love
- Instant Pot Pot Roast — fall-apart tender in two hours.
- Crock Pot Pot Roast with Cream of Mushroom Soup — three ingredients, ultra-comforting.
- Slow Cooker Mississippi Pot Roast — no packets, no butter, still hits hard.
- Cream of Mushroom Mississippi Pot Roast — creamy and tangy in the same bite.
- How to Cook a Frozen Pot Roast — forgot to thaw it? The Instant Pot has you covered.
- Pot Roast Lasagna — yes, it is exactly what it sounds like. And yes, it works.
The Leftover Math
A 3½ to 4-pound chuck roast in this recipe gives you about 8 servings. For a family of four, that is Sunday dinner plus at least one full meal in the fridge for the week.
Here is what to do with what's left:
- Freezer portions. Shred the beef, mix it back into the gravy, and freeze in 2-cup portions. Reheat covered on low.
- Pot Roast Lasagna. Save 2 cups of shredded beef and as much gravy as you can. The wine-based gravy makes an unreal lasagna sauce. This move is not optional.
- Open-faced sandwiches. Pile the beef and gravy over thick-toasted bread. The gravy sinks in. Done in ten minutes.
- Breakfast hash. The beef, the leftover potatoes, a hot skillet, and eggs over the top. The second-best bite of the weekend.
Not tonight? This is a weekend roast. If you need dinner faster, the Instant Pot version gets you there in two hours, and the slow cooker versions need nothing but layering and walking away.
📖 Recipe

Oven Pot Roast with Red Wine Gravy
Ingredients
- 3 ½-4 lb chuck roast dry-brined overnight with 1 tablespoon kosher salt
- 2 tablespoon olive oil for that sear
Aromatics & Herbs
- 2 yellow onions quartered
- 3 celery stalks sliced
- 1 whole garlic bulb halved horizontally
- 8 thyme sprigs
- 1 rosemary sprig
- 2 bay leaves
- 1 teaspoon garlic powder
- 1 teaspoon onion powder
- 1 teaspoon black pepper
Liquid
- 1 cup dry red wine cab or merlot, nothing sweet
- 2 ½ cups beef broth reserve ½ cup for slurry
Veggies
- 1 lb carrots peeled, cut chunky
- 1 ½ lbs red or gold potatoes quartered
- 1 yellow onion sliced
Thickener
- 2 tablespoon cornstarch mixed with ½ cup beef broth to make a slurry
Instructions
- Dry-brine the roast. Pat the chuck roast dry and season all over with 1 tablespoon kosher salt. Place it on a rack and refrigerate uncovered overnight (or at least 12 hours). → Let it sit at room temp for 30 minutes before cooking.
- Sear the roast. Preheat oven to 300°F. Heat oil in a Dutch oven over medium-high. Sear roast on both sides until deeply browned. Remove and set aside.
- Sauté aromatics. Lower heat. Add chopped onion and cook at least 5 minutes, scraping up brown bits. Add celery, garlic, thyme, rosemary, bay leaves, and dry seasonings. Cook 5 more minutes, keeping the garlic cut side down. Add wine and simmer 2–3 minutes.
- Braise the roast. Return roast to the pot and nestle into aromatics. Pour in 2 cups broth (don’t fully submerge). Bring to a simmer, cover tightly, and transfer to oven. Cook for 3 hours.
- Strain and thicken. Remove roast and strain out aromatics. Press them through a fine-mesh strainer to extract flavor. Add the reserved ½ cup broth mixed with 2 tablespoon cornstarch and stir well.
- Add veggies. Add carrots, potatoes, and sliced onion to the pot. Nestle roast on top. Bring back to a simmer, cover again, and return to oven for 1 more hour.
- Shred and serve. Remove pot from oven and uncover. Use two forks to shred the roast directly in the gravy. Serve with crusty bread or cornbread for soaking up every drop.
Video
Notes
Notes
- Beef cuts: Chuck roast works best, but mock tender or bottom round will do in a pinch. Just don’t skip the brine.
- Wine matters: Use a dry red like cabernet or merlot. No sweet reds.
- Salt timing: The dry brine replaces your usual pre-cook seasoning. No need to add more salt unless you taste and want more at the end.
- Braising level: The roast should sit above the broth, not swim in it. We're roasting, not boiling.
- Cornstarch tip: Mix the slurry just before adding to avoid clumps.
Tips
- Plan ahead. Dry brining overnight is non-negotiable. It’s where the magic starts.
- Don’t rush the sear. You want that deep brown crust--it builds the base of your flavor.
- Strain with purpose. Press those aromatics hard. There’s gold in there.
- Veg size matters. Big chunks = no mush.
- Let it rest. Like any roast, it's even better after sitting a few minutes in its own gravy.
Frequently Asked Questions
Can I skip the dry brine?You can… but you’ll lose the depth and tenderness that makes this roast special. A 12-24 hour dry brine is the secret weapon here. What’s the best wine to use?
Something dry and not too fancy--Cabernet Sauvignon or Merlot work great. Avoid anything labeled "sweet." Can I use a different cut of beef?
Chuck is king, but mock tender or bottom round can work. Just watch the cook time--leaner cuts may dry out. Can I make this ahead?
Yes. It actually tastes better the next day. Just reheat gently in the oven or stovetop, covered, with a splash of broth. What if I don’t have a Dutch oven?
Use any heavy, oven-safe pot with a tight-fitting lid. Or brown everything on the stove, then transfer to a covered roasting pan or deep casserole dish for the oven. Can I thicken the gravy without cornstarch?
Sure--try arrowroot, potato starch, or reduce the liquid on the stove for a more concentrated finish.
Nutrition
Final Words
If you have ever had pot roast that looked great but tasted flat, this is the fix.
Dry-brine the beef. Don’t skip the sear. Let the gravy do its job.
It is not the fastest recipe on the site.
It is the one you make when you want the deepest payoff.
Serve it with cornbread or crusty bread. Maybe a salad if you want to pretend balance matters.
And when the table goes quiet after the first bite, you’ll know it was worth the extra day.

Leave a Reply