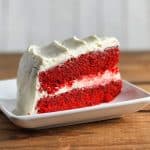
Gluten-Free Red Velvet Cake
This gluten-free red velvet cake is moist, vibrant, and topped with a classic cream cheese frosting. With just the right rise and texture, plus a few smart baking tricks, it’s a bakery-style cake that actually works, no gluten required.
Servings 12 slices
Calories 884kcal
Equipment
- Two 8-inch or 9-inch round cake pans
Ingredients
For the Cake
- 2 ⅔ cups Bob’s Red Mill Gluten-Free 1-to-1 Baking Flour
- 2 tablespoon unsweetened cocoa powder plus extra for dusting pans
- 1 tablespoon baking powder
- 1 teaspoon baking soda
- ⅛ teaspoon kosher salt
Wet Ingredients
- ½ cup unsalted butter room temperature
- 1 ½ cups granulated sugar
- 2 large eggs room temperature
- 1 cup vegetable oil
- 1 teaspoon white vinegar
- 2 teaspoon vanilla extract
- 1 cup buttermilk room temperature
- 2 ½ tablespoon red food coloring (liquid)
For the Cream Cheese Frosting
- 16 oz Philadelphia cream cheese room temp but still slightly firm
- ½ cup unsalted butter room temp but not too soft
- 1 ½ teaspoon vanilla extract
- 4 cups powdered sugar sifted if clumpy
Instructions
Prepare the Cake
- Preheat the oven to 350°F (175°C). Butter two 8-inch (or 9-inch) round cake pans, making sure to coat the sides and bottom. Then dust them with cocoa powder instead of flour; this helps the cake release easily and keeps the color deep red. Tap out any excess.
- Sift and mix dry ingredients. In a medium bowl, sift together the gluten-free flour, cocoa powder, baking powder, baking soda, and salt. Whisk to fully combine and set aside.
- Cream butter and sugar. In a stand mixer fitted with the paddle attachment (or using a hand mixer), beat the butter and sugar together on medium speed until light and creamy; about 3 minutes. It should be pale and fluffy.
- Add eggs one at a time. Crack in one egg, beat until incorporated, then repeat. The batter may look a little curdled after the second egg; don’t worry, that’s normal. Keep mixing until it smooths out again.
- Mix in remaining wet ingredients. Add the oil, buttermilk, vinegar, vanilla, and red food coloring. Start mixing on low to prevent splashes, then increase to medium speed. Beat until fully combined and smooth.
- Add the dry ingredients. With the mixer on low, add the flour mixture in two additions. Mix just until combined. It’s okay if there are a few small lumps; over-mixing can lead to a dense cake.
- Divide and bake. Pour the batter evenly between your prepared cake pans. Smooth the tops with a spatula and place on the same oven rack if possible. Bake for 25–30 minutes, or until a toothpick inserted in the center comes out clean.
- Cool completely. Let the cakes rest in the pans for 10 minutes, then carefully turn them out onto wire racks. Cool completely, about 1-2 hours, before frosting
Make the Frosting
- In a clean mixing bowl, beat the cream cheese, butter, and vanilla together on medium speed for about 3 minutes. It should be smooth, fluffy, and pale in color.
- Add the powdered sugar 1 cup at a time, mixing on low at first to avoid clouds of sugar, then increasing speed to beat it in fully. After all the sugar is added, beat for another 1–2 minutes until light and creamy. If the frosting is too soft, you can add extra powdered sugar ¼ cup at a time.
Assemble the Cake
- Place one cake layer upside down on your cake stand or serving plate. This gives you a flat surface for stacking.
- Spread about 1 ½ cups of frosting evenly over the first layer.
- Add the second cake layer, also upside down, and gently press to level.
- Use the remaining frosting to cover the top and sides. For a smooth finish, use an offset spatula or bench scraper. For a more rustic look, go with swirls and swoops!
Video
Notes
Not baking gluten-free?
You can easily make this with cake flour. Just omit the baking powder--no other changes needed.
You can easily make this with cake flour. Just omit the baking powder--no other changes needed.
Baking Tips
- Don’t overmix. Once the dry ingredients are in, mix just until you stop seeing streaks. A few lumps are totally fine.
- Cool completely before frosting. Even slightly warm cake will melt your frosting and create a slippery mess.
Gluten-Free Specific Notes
- Use the right flour. This recipe was tested with Bob’s Red Mill Gluten-Free 1-to-1 Baking Flour. Substituting another blend may change the texture.
- Extra baking powder matters. Gluten-free cakes need more lift. This recipe uses 1 tablespoon of baking powder to help get that soft, tender crumb.
Storage & Make-Ahead Notes
- Skip the freezer. This cake is not freezer-friendly—especially the gluten-free version. (See Real Talk moment in the post!)
- Short-term storage: Store covered in the fridge for up to 4 days. The flavors actually get better by day two.
- Make-ahead layers: You can bake the layers a day ahead and refrigerate (wrapped tightly) until ready to frost.
Recipe Variations
- Cupcakes: This recipe can also be used for cupcakes; makes about 24. Bake at 350°F for 18–20 minutes.
Nutrition
Calories: 884kcal | Carbohydrates: 147g | Protein: 9g | Fat: 32g | Saturated Fat: 19g | Polyunsaturated Fat: 2g | Monounsaturated Fat: 8g | Trans Fat: 1g | Cholesterol: 114mg | Sodium: 289mg | Potassium: 259mg | Fiber: 6g | Sugar: 111g | Vitamin A: 1078IU | Calcium: 157mg | Iron: 2mg